Word Compatibility Mode – What Is It?
When you open a document in Word, you may sometimes see the text [Compatibility Mode] in the Title bar next to the document name. In this article, you will learn about what Compatibility Mode means, how you can find out what Compatibility Mode a document is in, how you can update a document so it is no longer in Compatibility Mode, and more…
This article applies to Word 2007, 2010, 2013, 2016, 2019, and Word for Microsoft 365 (see How to find out what version of Word you have, if needed).
In Word, there are more concepts related to compatibility than Compatibility Mode.
If you want to learn about the compatibility options and layout options listed in the Word Options dialog box, at the bottom of the Advanced category options, see my article Word Layout Options & Compatibility Options.
For details about how to set the compatibility options via VBA (macros), see my article How to Set Word Compatibility Options via VBA.
This article was first published March 5, 2020.
About the Compatibility Mode of a Word document
If a Word document shows the text [Compatibility Mode] in the title bar, it means that the document was created or last saved in an earlier version of Word than the version you are using.
Example: You are using Word for Microsoft 365. You open a document that was created in or last saved in Word 2010. The text [Compatibility Mode] will appear after the document name in the Title bar on your computer. On the other hand, if the same document is opened in Word 2010, [Compatibility Mode] will not be shown.
Note that Word 2013, 2016, 2019, and 365 are already compatible. Therefore, you will not see the text [Compatibility Mode] if, for example, you open a document in Word for Microsoft 365 even if the document was created or last saved in Word 2013, 2016, or 2019.

Figure 1. Compatibility Mode shown in the Title bar of Word document means that it was created or last saved in an earlier version of Word than the version you are using.
As long as a document is showing [Compatibility Mode], new or changed Word features that were not included in the earlier version will be disabled. This means that the document can still be edited by people who are using the earlier version of Word. Also, a document in Compatibility Mode preserves the layout of the document from the earlier version.
In many cases, you can just ignore the information about Compatibility Mode. However, if you understand what it means, you can better decide whether you want or need to update the document to get out of Compatibility Mode.
If you open a document that is showing [Compatibility Mode], you can convert it to the format of your current Word version. Note that this may change the layout of the document. Also, people using an earlier version of Word may no longer be able to work with all parts of the document that have been created using newer features.
How to remove Compatibility Mode in Word
See how to update a document to get out of Compatibility Mode below.
How to find out which compatibility mode a Word document is in
The text [Compatibility Mode] in the Title bar tells you that the document was created or last saved in an earlier version of Word. However, the information does not tell you which Word version it originates from.
You can find out which specific mode the document is in. The following steps apply to Word 2010, 2013, 2016, 2019, and 365.
- Select File > Info.
- In the Inspect Document section, click the Check for Issues button > select Check Compatibility. See Figure 2 below.
- In the Microsoft Word Compatibility Checker dialog box that opens, click Select versions to show. A check mark is shown next to the name of the document's current mode. See Figure 3 below.
- Click OK.
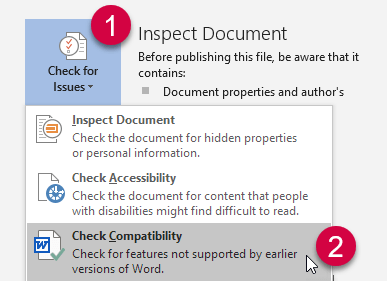
Figure 2. Select File > Info > Check for Issues > Check Compatibility to find the current mode.
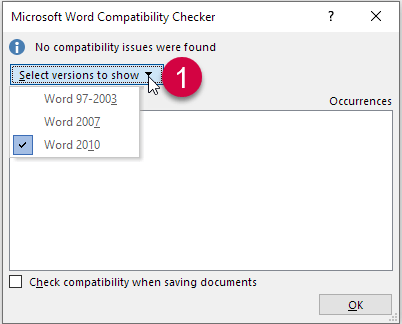
Figure 3. In the Microsoft Word Compatibility Checker dialog box, click Select versions to show. A check mark is shown next to the name of the document's current mode.
TIP: You can also find the actual Compatibility Mode via VBA. See my article How to Set Word Compatibility Options Via VBA .
How to find out whether there are compatibility issues
In some situations, content in a Word document may change if the document if opened in an earlier version than the version used when creating or editing the document. This happens, for example, if you have used features for creating content that isn't supported in earlier versions of Word. If you know that a document is going to be opened by users with an earlier version of Word than the one you are using, it is relevant to check whether there will be compatibility issues.
TIP: If you know for sure that some users with earlier versions of Word need to work with a specific document, it may be most practical to change the Compatibility Mode back to the earliest version in use. This will disable the features in your Word that are not compatible with the earlier version(s). Then you don't risk using content types that will not work in earlier versions.
You can revert to an earlier Compatibility Mode using a line of VBA macro code. You will find such VBA code in my article How to Set Word Compatibility Options via VBA.
See also the information about special compatibility issues in relation to table later in this article.
Example: You have created a document in Word 2010 or a newer version of Word. You have inserted check box content controls in the document. If the document is to be opened in Word 2007 or an earlier version, Word can't show check box content controls since they were not implemented until Word 2010. Therefore, Word needs to change the check box content controls to something else, as close to check box content controls as possible.
You can check whether there are such issues in relation to the content in a document. The following steps apply to Word 2010, 2013, 2016, 2019, and 365.
- Select File > Info.
- In the Inspect Document section, click the Check for Issues button > select Check Compatibility. See Figure 2 above.
- In the Microsoft Word Compatibility Checker dialog box that opens, click Select versions to show. Select the Word version you want to check compatibility with and uncheck other Word versions.
- Check the Summary field. Word will describe any issues found and will also show the number of occurrences for each type of issue.
- Repeat step 3 to check more Word versions, if relevant.
- Click OK when finished.
- If needed, make changes to the document to handle the issues found.
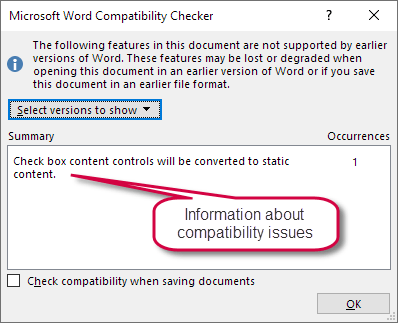
Figure 4. The Microsoft Word Compatibility Checker dialog box can show compatibility issues for different Word versions. In this example, the information tells that Word needs to change check box content controls if the document is opened in Word 2007 (selected in the Select version to show – not visible here).
How to update a document in Compatibility Mode to the current Word version and get out of Compatibility Mode
In the heading above, I have used the term "update" in relation to getting out of Compatibility Mode. You may instead think of it as removing or turning off Compatibility Mode. No matter the term used, you can use the procedures described as METHOD 1 and METHOD 2 below.
METHOD 1 – use Word's Convert feature to convert a document to the current Word version
IMPORTANT: This method will replace the old version of the document with the new one. If you want to keep a copy of the original version, save a backup copy of it first.
If you are using Word 2007:
- Click the Office button (top-left corner of the window).
- Click Convert in the dialog box that opens.
- If a message opens, showing information about the conversion, click OK.
If you want, you can turn on the check box to prevent that message from appearing again (see Figure 5 below).
If you are using Word 2010, 2013, 2016, 2019, 365:
- Select File > Info.
- Click the Convert button (see Figure 5 below).
- If a message opens, showing information about the conversion, click OK.
If you want, you can turn on the check box Do not ask me again about converting documents to prevent that message from appearing again (see Figure 6 below).
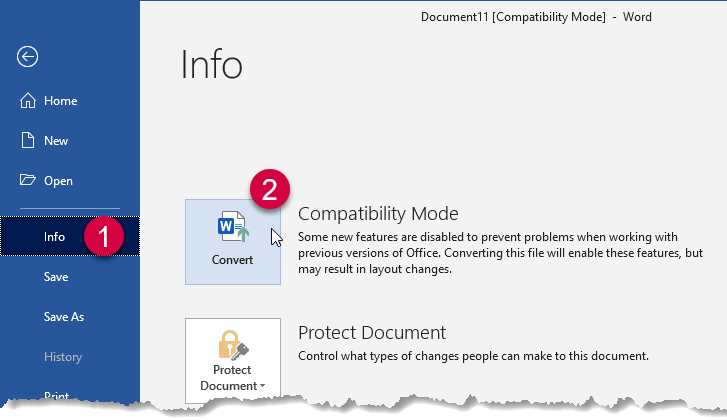
Figure 5. To convert a document to the current version, select File > Info and click Convert.

Figure 6. Message about what happens when converting a Word document.
The text [Compatibility Mode] disappears from the Title bar when you click OK in step 3 above. In case the document was in .doc or .dot format (formats from Word 2003 or earlier), the extension will not change to the newer file extension in the Title bar until you save the document (the extensions can be .docx, .dotx, .docm, or .dotm). The old file will be replaced by the converted version.
METHOD 2 – use the Save As dialog box to convert a document to the current Word version
If a document has been set to maintain the compatibility with earlier versions of Word, you can have it converted to the current version of Word as follows:
- Open the Save As dialog box (File > Save As or press F12).
- Turn off the check box Maintain compatibility with previous versions of Word. See Figure 7 below.
- If you want to keep the old version too, type a new name in the File name field. If you want to overwrite the old version, keep the same name.
- Click Save.
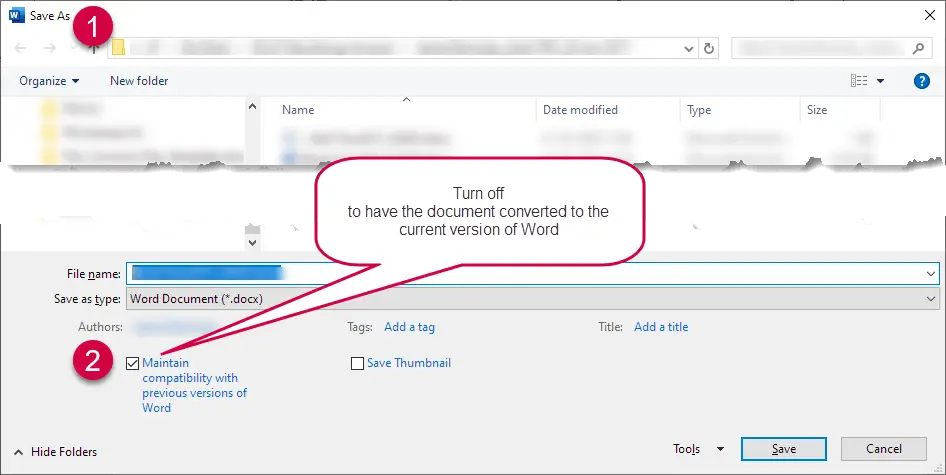
Figure 7. In the Save As dialog box, turn off Maintain compatibility with previous versions of Word and click Save.
How to change a document to Compatibility Mode and why you might want to do that
There may be situations where you want to set a document back to Compatibility Mode. This could be the case if you want to be able to turn on a special compatibility option that was available in an earlier version of Word and that is not available in the current version. You will find a detailed overview of all Word compatibility options in my article Word Layout Options & Compatibility Options.
The situation may also be that you rely on Word add-ins or macros that are not compatible with your version of Word.
You may also want to set a document back to a specific Compatibility Mode if users elsewhere need to work with the document and if those users are using an earlier version of Word.
You can set a document back to a specific Compatibility Mode using a macro. You will find macros for that purpose in my article How to Set Word Compatibility Options via VBA.
What to do if all new documents you create are in Compatibility Mode
As mentioned earlier, you may not need to do anything about documents in Compatibility Mode. However, you can change the situation, if you want.
What to do if new, blank documents you create in Word are in Compatibility Mode
If Word starts with a blank document in Compatibility Mode, it indicates that the template Normal.dotm is in Compatibility mode. To fix that, you need to open the Normal.dotm template and convert it to the version you are using:
- Start Word.
- Select File > Open, browse to the folder where Normal.dotm is found, select it and click Open.
The default location in Windows 10 is:
C:\Users\[user name]\AppData\Roaming\Microsoft\Templates
If you can't see the folder AppData, see How to make hidden files and folders visible. - Convert Normal.dotm. See how to convert a document above.
- Save Normal.dotm and close the file.
New, blank documents you create from now on will no longer be in Compatibility Mode.
What to do if new documents you create using other templates than Normal.dotm are in Compatibility Mode
If you create new Word documents based on other templates than Normal.dotm and if such documents are in Compatibility Mode, it indicates that the template(s) in question are in Compatibility Mode.
To convert a template so it is no longer in Compatibility Mode:
- Start Word.
- Select File > Open, browse to the folder where the template is found, select it and click Open.
The default location for custom templates in Windows 10 is:
C:\Users\[user name]\AppData\Roaming\Microsoft\Templates
If you can't see the folder AppData, see How to make hidden files and folders visible.
Note that your template may be saved in another folder. If the active document is attached to template, you can find the template path via Developer tab > Document Template. The path is shown in the topmost field in the Templates and Add-ins dialog box. If needed, see How to show the Developer tab in Word. - Convert the template. See how to convert a document above.
- Save and close the template.
From now on, new documents you create based on that template will no longer be in Compatibility Mode. Repeat the steps above for all templates that need to be converted.
What to do if new documents change to Compatibility Mode when saving
If all new documents you create change to Compatibility Mode when you save the document, the cause is most likely the setting of a specific Save option in Word. Do as follows:
- In Word, select File > Options.
In case of Word 2007: Office button > Word Options. - Select Save to get access to the save options. See Figure 7 below.
- Click the Save files in this format list and select the first option, Word Document (*.docx). See Figure 7 below.
- Click OK.
- In the next dialog box that opens, click Yes if you want to change the default setting for all Office applications. See Figure 9 below.
From now on, new documents you save will be in .docx format compatible with your current Word version.
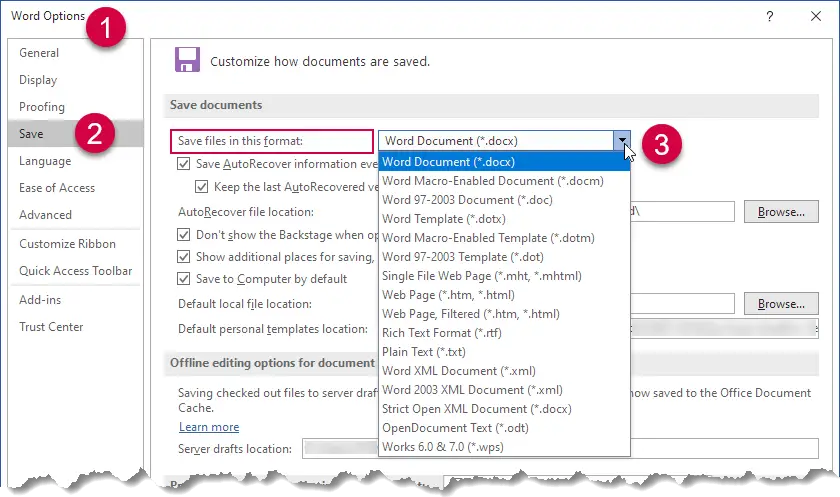
Figure 8. Set Save files in this format to the first option to have all new documents saved in .docx format compatible with your current version of Word.

Figure 9. Select whether you want to change the default setting for all Office applications.
Special compatibility issues with tables – before and after Word 2013
Since Word 2013, tables have behaved differently than in Word 2010 and earlier versions. This is due to a Microsoft design change:
- Word 2010 and earlier versions: Left and right cell margins exceed page margins.
- Word 2013 and newer versions: Left and right cell margins do not exceed page margins.
This means that the width of tables with left and right cell margins that were created in Word 2010 or earlier (or created in documents in Word 2010 Compatibility Mode), will be reduced if the document is converted to Word 2013 or newer format. A reduced table width may cause different line breaks in cells and may cause row heights to increase. Such changes may also cause different page breaks. Therefore, you should check documents with tables carefully to correct issues, if needed.
See the illustration below.
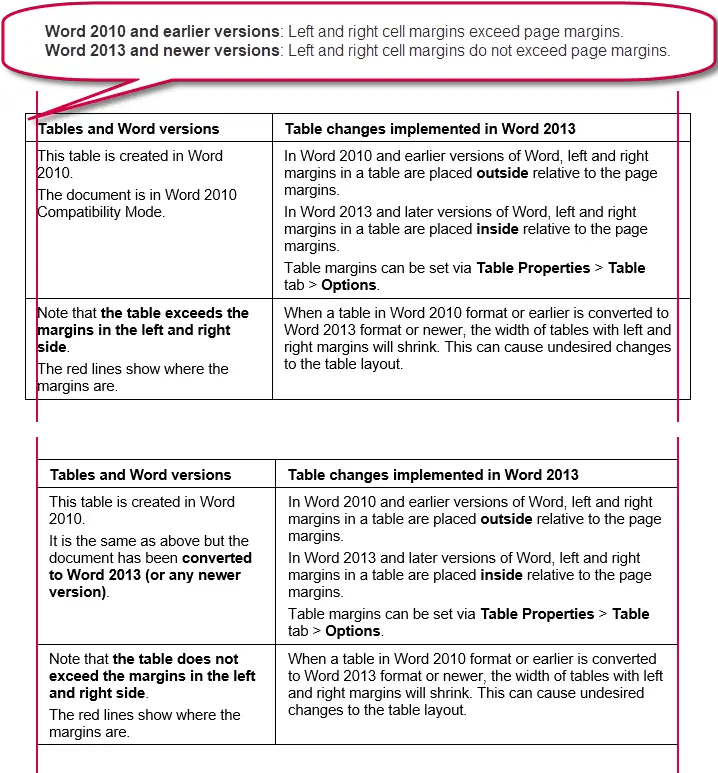
Figure 10. Example showing a table with left and right cell margins, before and after converting from Word 2010 format to a newer format. The red lines show where the margins are. For further details, read the text in the tables in the illustration.
What to do if you need to convert to a newer format than Word 2010 and, at the same time, preserve the table widths and left alignment
If you need to convert documents that include a lot of tables created in Word 2010 or earlier, and if you – for any reason – need to preserve the table widths and left alignment unchanged, it requires quite a lot of work.
You will have to reduce the left table indent corresponding to the cell margin of the left-most cell(s). In addition, you must compensate for the reduced column widths. Not all tables may be regular. If there are merged cells, different cell margins, and other irregular layout, it quickly becomes complex. It is possible to write VBA macros to handle the corrections. If all kinds of possible variations are to be taken into account, it isn't piece of cake. Personally, I have had to handle such changes in very large and complex documents – I know by experience how many variants and details need to be taken into account.
If at all possible, I recommend that you adjust the tables to compensate for too narrow columns, inappropriate line breaks or page breaks and that you don't try to make the tables look totally as before.
Personally, I find that the document layout looks much cleaner when the tables are aligned to the margins instead of exceeding the margins. Until Word 2010, I always set the cell margins to 0 (zero) and added indentation to the styles I used in tables in order to have the table and margins align.
Related information
See my article Word Layout Options & Compatibility Options for a detailed overview of all compatibility options in Word, including information about which options are found in which versions of Word.
Setting compatibility options via VBA (macros): My article How to Set Word Compatibility Options via VBA includes macros ready for use. The macros let you set all Word compatibility options, change the Compatibility Mode of a document, and more.
For an overview of changes in Word features between versions, see the Microsoft article Compatibility changes between versions.
For information on setting Compatibility Mode via Group Policy, see Manage compatibility mode for Office.
